Single Sign-On - Other OIDC or SAML Providers
Before configuring an identity provider for your Jetstream team, ensure that you have verified your organization's domain ownership.
Jetstream supports Single Sign-On (SSO) using any identity provider that is compatible with OpenID Connect (OIDC) or SAML protocols.
Configure SSO for OIDC Providers
Your identity provider must support the OpenID Connect Discovery specification for Jetstream to automatically discover the necessary endpoints and configuration.
If your Identity Provider does not support OIDC Discovery, reach out to Jetstream support for assistance configuring your connection.
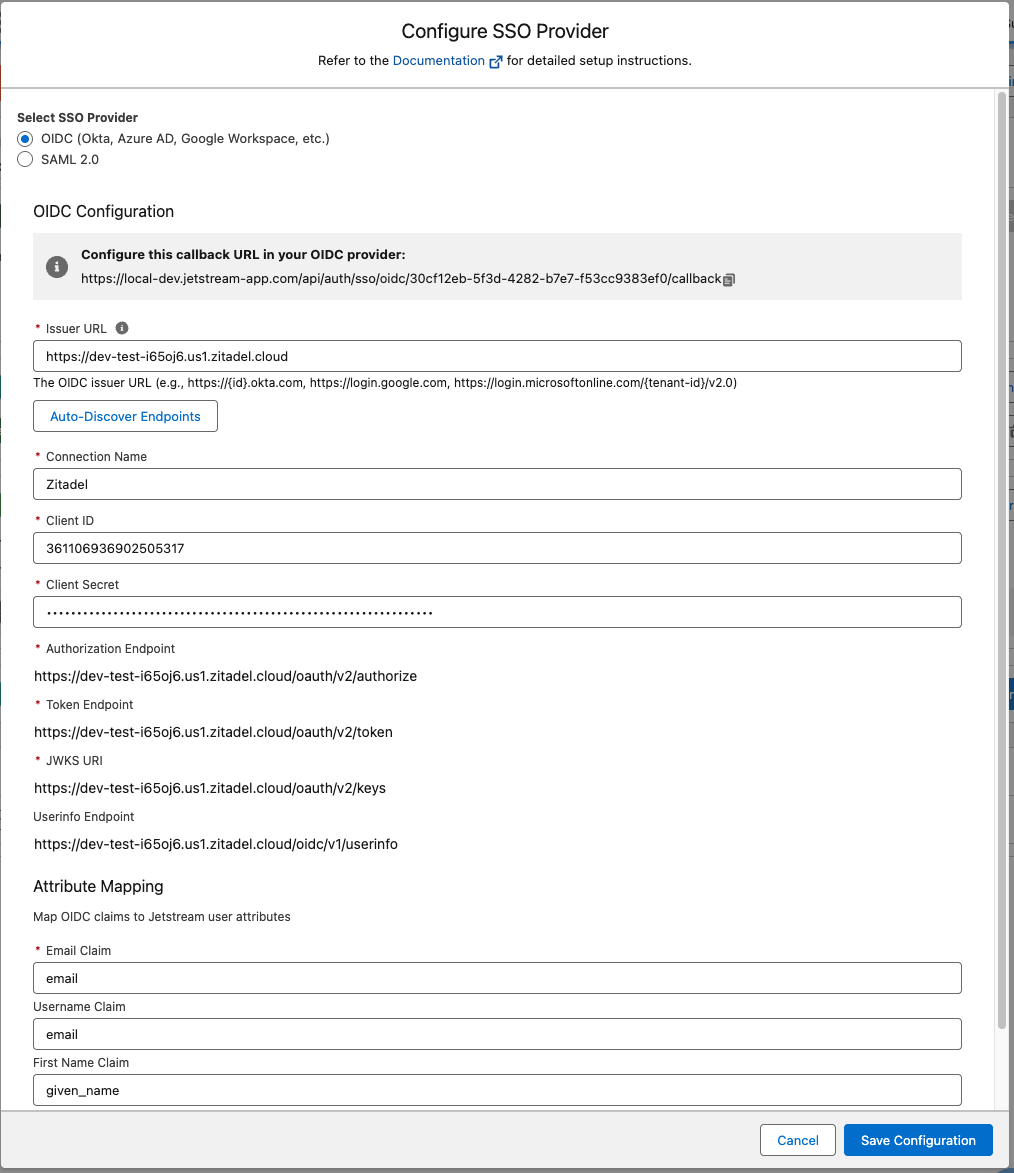
In Jetstream, choose "Add SSO Provider" from your Team Dashboard and select "OIDC" as the provider.
Create an Application in Your Identity Provider
Create a new OIDC application in your identity provider's admin dashboard.
Your redirect URL is displayed in the Team Dashboard when adding the SSO provider. It will be in the format:
https://getjetstream.app/api/auth/sso/oidc/{uuid}/callback
After you create your application, copy the Client ID and Client Secret from the app's overview page.
Access your issuer domain - if you are unsure what that is, it is normally the domain of any of the available authentication endpoints in your identity provider's documentation.
For example, if you were using Zitadel as your identity provider, your issuer URL would be in the format https://{yourDomain}.zitadel.cloud.
You can verify the issuer URL by checking that the following URL returns a JSON response with the necessary OIDC configuration:
https://{yourIdpDomain}/.well-known/openid-configuration
Configure Jetstream Connection
Enter the Issuer URL. Jetstream automatically discovers the necessary endpoints and configuration for your identity provider from the issuer's discovery document when you save.
Copy the Client ID and Client Secret obtained from your identity provider into the corresponding fields in the Team Dashboard when adding the SSO provider.
Optionally you can configure the attribute mapping, but the default configuration should work for most providers. The default configuration maps the email claim to the user's email and the name claim to the user's name.
Click "Save Configuration".
Enable the connection
After saving the connection, make sure to check the "Enable SSO" checkbox to enable SSO for your team.
You can optionally allow users with specific roles to bypass SSO, by default this is enabled for administrators.
Enable IdP-Initiated Login (Optional)
If your identity provider supports IdP-initiated login (sometimes called "app launcher" or "app tile" login), you can configure it so users can launch Jetstream directly from their identity provider's dashboard.
Copy the Initiate Login URI shown in the Jetstream Team Dashboard SSO configuration and configure it in your identity provider. It will be in the format:
https://getjetstream.app/api/auth/sso/oidc/{uuid}/initiate
When a user clicks the Jetstream app in their identity provider's dashboard, they will be redirected to this URL, which initiates the OIDC login flow and logs them in automatically.
Configure SSO for SAML Providers
In Jetstream, choose "Add SSO Provider" from your Team Dashboard and select "SAML" as the provider.
Leave this modal open while you configure the SAML application in your identity provider, as you will need to copy values between the two.
Create an Application in Your Identity Provider
Create a new SAML application in your identity provider's admin dashboard.
You will need to provide your identity provider with the following values from the Jetstream SAML configuration modal:
- ACS URL (Single Sign On URL): The URL that your identity provider will post SAML assertions to.
- Entity ID (Audience URI): A unique identifier for your Jetstream team's service provider.
Configure Attribute Mapping
Configure the attribute mapping in your identity provider to send the following attributes in the SAML assertion:
email— the user's email address (required)firstName— the user's first namelastName— the user's last name
Configure Jetstream Connection
Once your SAML application is configured, copy the Metadata URL from your identity provider and paste it into the Metadata URL field in Jetstream, then click "Fetch Metadata". This will automatically populate the IdP SSO URL and certificate fields.
Alternatively, you can download the Metadata XML file from your identity provider and paste its contents into the IdP Metadata XML field in Jetstream.
Enable the connection
After saving the connection, make sure to check the "Enable SSO" checkbox to enable SSO for your team.
You can optionally allow users with specific roles to bypass SSO, by default this is enabled for administrators.