Load Files and Attachments
Upload attachments and files to Salesforce.
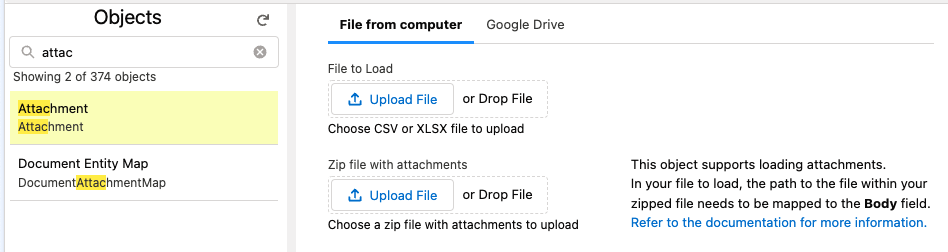
If you just want to update existing records for a supported object, you don't need to include a zip file with your data load.
When you choose an object that supports file attachments, such as the Attachment object, you will have the ability to optionally include a zip file with your attachments.
File Structure
The names and paths of the the files inside your zip file need to be included on your data file and mapped to the field where Salesforce stores the content.
If your zip files has the following images:
image1.pngmy folderimage2.pngimage3.png
pdfABC-corp-service-order.pdf
Then your data file needs to have the following rows, assuming you are loading to the Attachment object, otherwise the Body field might be different:
| Name | Body |
|---|---|
| image 1 | image1.png |
| image 2 | my folder/image2.png |
| My image 3 | pdf/ABC-corp-service-order.pdf |
You can choose anything you want for the Name, this will be the name of the record in Salesforce.
- If you have extra files in your Zip file, they will be ignored.
- If your load file references a file that does not exist in the Zip file, this will result in an error.
Loading Data
On the final load screen, you will be limited to the options that you can change when you are loading a zip file.
Depending on the size of your zip file, preparing the data may take a minute or two to pre-process your data to send to Salesforce. This is all done in your browser and none of your data is logged or stored on the Jetstream server.
Limitations
Our pro plans include 1GB uploads. The Browser extension and Desktop Application have unlimited upload sizes.
- Upload limits are tiered: Free users can upload zip files up to
50MB, paid users up to1GB, and Desktop Application or Browser Extension users have unlimited upload sizes. If your data exceeds your plan's limit, split your attachments into multiple loads or upgrade your plan. - The batch size will be auto-calculated to ensure that Salesforce request limits are not exceeded.
- You are required to use the batch api to perform the upload, which means that there may be more api requests required.
Supported Objects
The following objects allow loading files:
- Attachment
- Document
- ContentVersion
Creating Content Versions
Refer to the Salesforce ContentVersion documentation for full details.
When you create a ContentVersion, a ContentDocument is automatically created, so you don't need to create the ContentDocument in advance.
If you want to associate a file to a record, you will need to create a ContentDocumentLink record to link the ContentDocument with the desired record.
Here are the key fields that you may need to consider when loading to attachments
| Name | Description |
|---|---|
| Title | The label for the file |
| PathOnClient | Set this to the filename with the extension (e.x. image1.png) |
| VersionData | Set this to the full path of the file within the zip file with the extension (e.x. pdf/ABC-corp-service-order.pdf) |
| Origin | Set this to C to add to your personal library or H to add to your My Files (Chatter) |
Linking a ContentDocument to a record
After loading your ContentVersion, you will need to re-query the records and get the ids for the ContentDocument record that was automatically created so that you can create the ContentDocumentLink record.
| Name | Description |
|---|---|
| ContentDocumentId | Id of the ContentDocument. This will always use the latest version |
| LinkedEntityId | The related record (e.x. the Account Id) |
| ShareType (optional) | V (Viewer permission), C (Collaborator permission), I (Inferred permission) |
| Visibility | AllUsers, InternalUsers, SharedUsers |